Using Mochi SRS for Japanese vocabulary study
A quick intro to the Mochi SRS app, what sets it apart from the competition, and how you can use its features to improve your study
10-15 minute read
Published
Coming fresh out of studying a comprehensive React course on Udemy, I finished my first project, _Devclock, which gave me experience in producing and deploying in vanilla React. Wanting to take my React skills a step further and learn more powerful tools (while also move away from relying on PHP + Wordpress), I set my sights on my next project, a portfolio/blog site made with NextJS!
Quick links:
Originally, I had a totally different idea of how the site was going to look. I would have a vectorised Japanese ukiyo-e painting serving as the key hero image, and animate all the different features of the painting. The foreground and background would shift with a parallax effect, clouds and boats would drift by, smoke would rise out from the village in the background and so on.
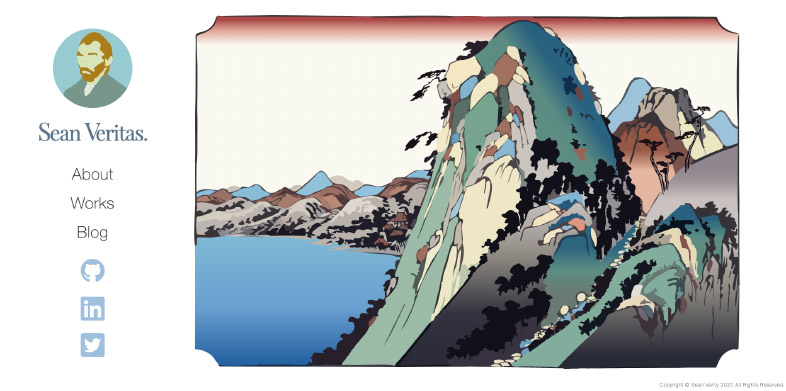
My original site design feat vectorised image of one of Hiroshige's paintings of Hakone. Note the old color scheme for Vincent Van Gogh
While it was a neat idea, and the vector image was already prepared, I knew it would take an age to code, and it might not necessarily turn out the way I wanted. I scrapped it entirely for my site's current design. The current design is simpler, cartoony, 'dev'-y, expressive, and impactful, while simultaneously requiring a lot less time to implement. Overall, I'm happy with it. I used Adobe XD for laying out the site and prototyping, and built the assets (icons, Vincent Van Gogh portrait etc.) in Adobe Illustrator.
I'm aware something like NextJS and Wordpress can't really be compared (for example, you can build a blog with a NextJS frontend and the Wordpress REST API). One is purely front-end, and one is a CMS coupled with PHP server-side rendering. But seeing as before learning React I was a Wordpress dev, I had to weigh up whether using NextJS over Wordpress was a good choice for me and the site.
Switching to creating a blog using NextJS involved re-learning a lot of concepts when it comes to blog creation. For example, I had to build everything from scratch. Wordpress has all the basic blog features from the get-go. Categories, tags, thumbnails, querying for getting articles, accessing post meta-data, adding custom fields and so on. All of this functionality had to implemented manually in a NextJS blog.
However, at the risk of things being implemented incorrectly, it does allow for much greater freedom.
It also just feels a lot more scalable using React's component/prop way of doing things. Creating a component-based site in Wordpress just feels kind of wrong once you get used to doing it in React. Templating techniques such as using get_template_parts with $args just feels second class in Wordpress compared to how it's managed in React.
What's also huge is when you compare the end site's user experience. Having the whole NextJS site as a single application with page transitions feels so much better than an Apache Wordpress site ever could.
So yeah, once I have put together a solid NextJS boilerplate/template (one where I can scaffold entire sites in NextJS as fast as I can with my Wordpress theme boilerplate), then we'll really be cooking.
Gatsby probably is the logical choice for a site like this, it has countless base themes and plugins to help fast-track the creation process. Plus, considering that all my post data is static, there is no need for any SSR. I could've used Gatsby.
So why did I choose NextJS?
It's powerful! It's just as well-supported and maintained as Gatsby, and most importantly it gives the option for incorporating server-side rendering further down the line. I'll definitely be using NextJS in the future, more complex projects (one's where using NextJS is warranted), so I thought I might as well dive straight into NextJS from the very beginning.
Initially I looked into headless CMS options like Prismic and Sanity. But once I had taken a look at some of their official demo project repositories on Github, I knew that learning one of these CMSs was basically like learning a new framework in and of itself, and that all the platform-specific code required would bloat my project's codebase. I wasn't willing to take that leap just yet, especially on such a simple, one-man-band project like this site.
Probably down the line I'll use a headless CMS for client projects, but not just yet.
I needed something simple, and initially looked into using Markdown files (MD for short – a way of writing and storing mixed text/media content) to write and store posts. I am the only one involved in creating and updating blog posts, and they weren't going to be particularly media-rich posts, so I thought MD files would do just fine.
The official NextJS team provides a wonderful demo blog repository that uses Markdown files for the post content. I used this as the main base for my project, and built off of it.
Through Josh Comeau's blog post, I stumbled upon MDX (Markdown with JSX support – allowing articles to have embedded React components). I definitely wanted this functionality in my site. The primary thing I'd be able to use MDX for was to include code snippets with syntax highlighting into my blog posts.
Once I chose to switch from vanilla Markdown to MDX, I had to update my file parser to support the new .mdx files.
There were a few options for parsers, but I ended up opting for mdx-bundler. It allows you to parse the MDX file inside getStaticProps, and then pass the parsed content to the React component inside your page where it is rendered.
The parser also allows you to overwrite the default HTML spat out by the parsing process, so you can specify the replacing of certain elements with your own custom components.
I do this with my HTML headings, where the default conversion process of my titles into <h2> and <h3> tags is intervened, and they are automatically replaced with my own custom heading components, which display anchor links beside the title text (in my code, this magic happens here).
// The title if it were converted normally<h3>My dummy title</h3>// Instead it gets converted into:<h3 id="my-dummy-title" class="o-anchor-heading">My dummy title<a href="#my-dummy-title"><div class="icon"><svg class="icon__svg">/*...the svg data*/</svg></div></a></h3>
With the embedding of React components now supported, I can also do cool things like embed animated interactive content like this:
Which can be done with just the following:
import ExampleComponent from "./ExampleComponent";// ... the rest of the article<ExampleComponent />
The syntax highlighting in my code snippets is also done through an embedded React component. This component (I've called it <Code>) imports prism-react-renderer, a library which expands upon PrismJS (a popular syntax highlighting parser) to parse the input code.
Once setup, code snippets only require being wrapped with the <Code> component, as below:
<Code lang="js" children={'console.log("Hello World");'} />
Pro Tip: Place your code inside backticks and inside the children prop of your <Code> component. Placing the snippet directly inside the component will cause your MDX parser to have a tantrum.
If you click on the '日本語' button in the header menu, the language will change to Japanese. The multilingual aspect of this site was surprisingly one of the easier features to implement.
Once you set up your different locales (in my case /en/ for English and /jp/ for Japanese) and your default locale inside next.config.js, all routing and redirects are handled automatically by NextJS. In each component you can access the current locale either through the router object passed to you by the useRouter() hook, or for your server-rendered content, through the context argument provided to you by getStaticProps().
Initially I was thinking of implementing my own translation-text-grabbing mechanism for storing and getting translations between locales, just by using default i18n functionality. However I found a library called next-translate, and with its useTranslation() hook for getting text, and its <Trans> component for dynamically inserting HTML into said text, it had everything I needed to get my site set up.
Through this library you set and create your namespaces JSON files and the corresponding pages that they should be loaded by, and then through their custom useTranslation() hook you can retrieve the translations per namespace as needed. The placement of files and details on how to set up the i18n.json settings file can all be found in their documentation.
useTranslation() also gives you the current locale string through the variable lang, which often makes useRouter() if used in the same scope.
next-translate in action might look something like this:
import useTranslation from "next-translate/useTranslation";export default function PostsArchive({ posts }) {// Get translation object & locale string ("en" or "jp")const { t, lang } = useTranslation("common");// Conditionally set date format based on localeconst formatString = lang === "en" ? "LLLL do yyyy" : "yyyy-MM-dd";return (<div><h2>{t("posts-title")}</h2> // Use translation object<ul>{posts.map((post) => {return <PostItem post={post} dateFormat={formatString} />;})}</ul></div>);}import { getPostData } from "../lib/posts-api";export async function getStaticProps(context) {const { locale } = context;// Conditionally get post-data by localeconst posts = await getPostData(locale);return { props: { posts } };}
I thought this would be a simple addition, however it created quite the headache. After searching all over for something that worked, I found a solution using Framer Motion (with help from this article by James Wallis).
In my _app.js file I wrapped my page <Component> with Framer Motion's <AnimatePresence> component.
<AnimatePresence exitBeforeEnter><Component {...pageProps} key={url} /></AnimatePresence>
I then wrapped all my child page's content in a custom <PageTransitionWrapper> component, customising the in/out timing effect by passing props to <PageTransitionWrapper> (code here).
Once I had it working perfectly in my development environment, I built it locally and tested. Tragedy struck. Once you clicked on a link to a different page, the transition animation would start as normal, but all the styles for the components on the previous page would be lost, leaving the previous page an ugly mess as it faded from view...
I'm guessing the NextJS build step over-optimised the SASS Modules that I had been using for styling my app up until then. It must have been discarded the previous page's styles at the start of the transition. Either way, apparently it is a known (and unfixed) bug.
Regardless of why it happened, it answers a question you may have had if you looked at my source code.
Before encountering the page-transition bug, I had been coding this app with SASS modules. But this wouldn't fly with the Framer Motion page transition/NextJS bug.
Using a single global stylesheet would fix the bug, but I would lose some performance benefits from lazy-loading styles, classname minification, and also the safety of locally-scoped styles.
Completely refactoring my app to work with a single global SASS stylesheet was painful. But, it's a tiny site, and I was already efficient at coding safe and maintainable stylesheets, so sacrificing the drawbacks for slick page transitions ultimately felt worth it.
I could definitely spend a lot of time perfecting this site, adding features into infinity and beyond. But for now, here's what's on the to-do list for the site:
Features :
Things I should actually probably get around to :
:root { scroll-behavior: smooth; }, which is unsupported by Safari.target="_blank" and the external-link arrow iconA quick intro to the Mochi SRS app, what sets it apart from the competition, and how you can use its features to improve your study
In this short post I discuss how I created an interactive map app, capable of panning, painting, zooming the map, and also saving the final map as a PNG